Kim's Class Reveal ~ It's a Mini Album!
Posted: Fri Apr 24, 2015 4:40 am
No photos yet ladies!!! That has to wait until Friday, May 1st! I have to save at least one surprise! 
Edited: I know this is a larger project then just a layout or card. I was going to revel next week the goal for the crop and the extension I would offer a challenge for June and July.
Edited: Amount of Cardstock & Number of Photos for project is below in response to jlparkmark's post an is written in red to spot easily!
We will be making what I call "The Loaded Mini Album!"
Just on the inside covers there are spaces for up to 14 photos! Yes 14!
Pages in this album will all be mirror images so you'll be able to move quicker.
Completely constructed from scratch. So to be ready you'll need to cut your 12x12 chipboard into 4 pieces.6x6! For those who have the chipboard from WRMK Page refills this is slightly larger then 12x12. I trimmed 1/3 inch off one side with craft knife to fit in my trimmer and then cut it down to 6x6.
For those of you without the WRMK Chipboard here's the link(s)!
12x12 Bazzill Chipboard
6x6 Chipboard
Cardstock and pattern papers are your choice, I prefer a neutral cardstock and I have selected my favorite Bazzill Black O/P as I'm using bright bold papers from Basic Grey Highline. Both outside covers are yours to create. I love a neutral cardstock and just on the inside covers I have used 4 sheets of cardstock. I'll use just a little over a sheet on the next two pages. The two middle pages will have approximately two sheets. I would add a couple of sheets just in case above what I just wrote.
You'll need two album rings and a hole punch to put the album together.
Hanging items....ya'll gave me more ideas, Think of it as creating a jewelry piece to hang from the top ring of the album. It's all your choice of how to create it. I like a couple of things in the store that may have you thinking that there might be something in your stash that would work.
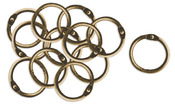 These are sold out but I imagine back in store soon. Little half inch rings. manufacturer Art C.
Tim Holtz has some great items to hang charms, beads, etc:
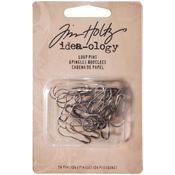 Idea-ology Antique Metal Loop Pins
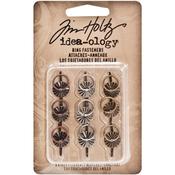 Ring Fasteners
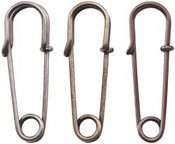 Wire Pins
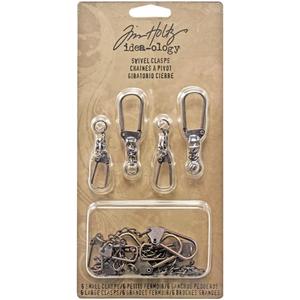 Swivel Clasps
Adhesive on mini albums I have come to love Scor-Tape. I like a roll of 2 inch and a roll of each increment going down in measurement to 1/4 inch. If you choose other adhesive it is fine. My instructions will be with Scor-Tape but you can adapt it to your adhesive. If you decide on Scor-Tape and it is your first time using it, make sure you have some extra sheets of cardstock as it is a very unforgiving adhesive. Once you stick it to something it is stuck! It has eaten more cardstock and pattern paper then I can even count....LOL! I am in love with this adhesive though! It will add tremendous stability to light weight chipboard. I will NEVER use anything else for constructing a mini again! And now that I am use to it I rarely have it eat paper.
Tags: You'll need 6 number #10 tags (4 1/8" x 8 1/2"). In the store they can be found under the brand Inkssentials. Or you can make your own. They will be cut down to 4 1/8 x 5 7/8 inches. I will be covering mine in cardstock!
Die-cuts to match your papers. The number, it depends on how many you want to dress your album up..
Other embellishments is all up to you. I am sure I'll be pulling some from my stash.
If you wish to make a closure for the album that's great! Mine is going to a niece and I'll make another later that will go to my nephew. Since they are 9 and 11 years old my closure will be braided Baker's Twine which will be forgiving to that age group or if lost can easily be replaced.
Your choice of ink to use on chipboard to color(s) of your cardstock.
You'll need a scoreboard or your trimmer and bone to score cardstock.
Time slot for the class is 1pm EST on Saturday, May 2nd. Other time zones: 12pm CST; 11am MST and 10am PST
Edited: I know this is a larger project then just a layout or card. I was going to revel next week the goal for the crop and the extension I would offer a challenge for June and July.
Edited: Amount of Cardstock & Number of Photos for project is below in response to jlparkmark's post an is written in red to spot easily!
We will be making what I call "The Loaded Mini Album!"
Just on the inside covers there are spaces for up to 14 photos! Yes 14!
Pages in this album will all be mirror images so you'll be able to move quicker.
Completely constructed from scratch. So to be ready you'll need to cut your 12x12 chipboard into 4 pieces.6x6! For those who have the chipboard from WRMK Page refills this is slightly larger then 12x12. I trimmed 1/3 inch off one side with craft knife to fit in my trimmer and then cut it down to 6x6.
For those of you without the WRMK Chipboard here's the link(s)!
12x12 Bazzill Chipboard
6x6 Chipboard
Cardstock and pattern papers are your choice, I prefer a neutral cardstock and I have selected my favorite Bazzill Black O/P as I'm using bright bold papers from Basic Grey Highline. Both outside covers are yours to create. I love a neutral cardstock and just on the inside covers I have used 4 sheets of cardstock. I'll use just a little over a sheet on the next two pages. The two middle pages will have approximately two sheets. I would add a couple of sheets just in case above what I just wrote.
You'll need two album rings and a hole punch to put the album together.
Hanging items....ya'll gave me more ideas, Think of it as creating a jewelry piece to hang from the top ring of the album. It's all your choice of how to create it. I like a couple of things in the store that may have you thinking that there might be something in your stash that would work.
These are sold out but I imagine back in store soon. Little half inch rings. manufacturer Art C.Tim Holtz has some great items to hang charms, beads, etc:
Idea-ology Antique Metal Loop PinsRing Fasteners Wire PinsSwivel ClaspsAdhesive on mini albums I have come to love Scor-Tape. I like a roll of 2 inch and a roll of each increment going down in measurement to 1/4 inch. If you choose other adhesive it is fine. My instructions will be with Scor-Tape but you can adapt it to your adhesive. If you decide on Scor-Tape and it is your first time using it, make sure you have some extra sheets of cardstock as it is a very unforgiving adhesive. Once you stick it to something it is stuck! It has eaten more cardstock and pattern paper then I can even count....LOL! I am in love with this adhesive though! It will add tremendous stability to light weight chipboard. I will NEVER use anything else for constructing a mini again! And now that I am use to it I rarely have it eat paper.
Tags: You'll need 6 number #10 tags (4 1/8" x 8 1/2"). In the store they can be found under the brand Inkssentials. Or you can make your own. They will be cut down to 4 1/8 x 5 7/8 inches. I will be covering mine in cardstock!
Die-cuts to match your papers. The number, it depends on how many you want to dress your album up..
Other embellishments is all up to you. I am sure I'll be pulling some from my stash.
If you wish to make a closure for the album that's great! Mine is going to a niece and I'll make another later that will go to my nephew. Since they are 9 and 11 years old my closure will be braided Baker's Twine which will be forgiving to that age group or if lost can easily be replaced.
Your choice of ink to use on chipboard to color(s) of your cardstock.
You'll need a scoreboard or your trimmer and bone to score cardstock.
Time slot for the class is 1pm EST on Saturday, May 2nd. Other time zones: 12pm CST; 11am MST and 10am PST
