Get FREE shipping with your $35 order with code FREESHIP35

User avatar

JulesinParadise

Tiki Bar Mgr

Vintage Noel banner class here!
Good morning ladies. This morning I'll walk you through the steps to creating a vintage NOEL canvas banner. There are three main steps to this and I will update in this thread after a few minutes between each to allow for any questions. If you do this class at a later date and have any questions then, please feel free to pm me at any time.

Image

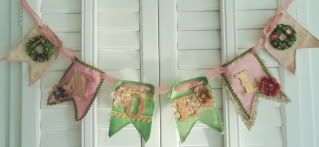
Part I : hand dying the banners or canvas (Total Time is about 30 min to dye all six pieces and however long it takes to dry them)

I used the Maya Road canvas banner which come in two different types...single point and double point. Either one works for this banner or any canvas piece for that matter. I used Maya Mists in Emerald Metallic for the green banners, Glimmer Mist Cranberry Zing for the pink and Glimmer Mist Coffee Bean for the tan. All of these are available from the store and may be purchased at any time. I did my dying in a throw away roaster or basting pan that I picked up for a dollar. This protected my sink and counter.

I found that hand dying rather than misting the canvas saved on the amount of mist I used and that I was better able to regulate the color intensity this way.

Step one: shake the bottles well and remove the lid putting a few drops of the first color into the tin roasting pan.
Image

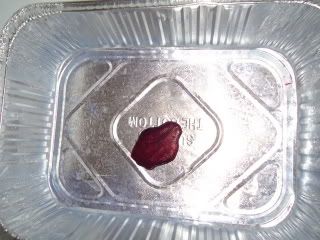
Step two: Add the water a bit at a time. The more water you add to the mist, the lighter the color will be on the dried canvas. The Maya Mist has more intense color and less sparkle than the Glimmer Mist so I added a bit more water to that color when I prepared it.
Image

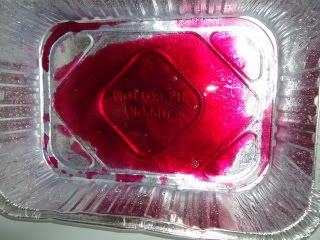
Step three: place the banner pieces one at a time into the dye, making sure all edges are infused with the color by using your hands(with or without rubber gloves) or a pair of tongs. I did 2 canvas pieces in each color. ( I also dyed some tulle, some tags and some ribbons in the same color for future use).

Image
Image

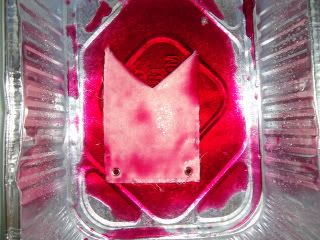
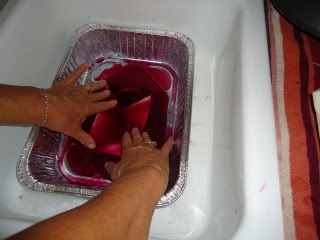
When you pull the piece out of the dye, if the color is too uneven (I find that part of the vintage-y look actually), you can rinse some of the color off under cold water and pat color back onto the piece or submerge it in the dye again. I dry these pieces on a paper towel (textured gives fun soft patterns into the drying pieces) or an old towel.

After I finished with one color, I stored any left over dye into a small lidded jar for future use. The dye can be removed from your hands with Fantatix Kitchen cleaner which I found to work better than plain soap. This also applies to appliances that may have been splashed.

Step four: I put the piece outside in the sun to dry weather permitting. Otherwise you can place them over a heat vent or drying rack being sure both sides dry. I do not advise putting them into the clothes dryer. You can also use a heat gun or hair dryer to set the color, which speeds up the drying process.

We'll take a break here for any questions you might have and then come back in this same post for PartsII: the letters (this step only takes about 5 min) and Part III: embellishing the banner pieces ( the most fun part!)


PART II: lettering.
I used Tim HOltz Grunge board letters as I love how they absorb color. I painted mine and then inked them but you could Glimmer or Maya Mist them as well.


Image

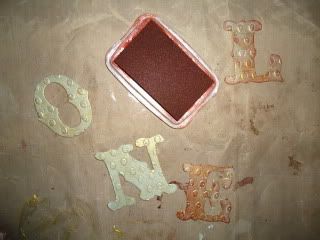
Step 1: I painted the letters in a metallic gold and let it dry.

Step 2: I used a brown Brilliance ink pad and tapped it over the embossed parts of the letters and "distressed" the edges of the letters by dragging the end of the ink pad over the edges of the letters. For tight corners, I dipped a Fantastix tiny tipped applicator into the ink. I use to use q tips but found they smeared a bit too much.

Brilliance inks need to be heat set or air dried over night before they set up.


PART III: embellishing the panels

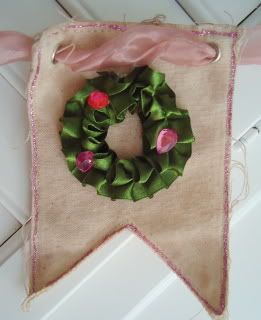
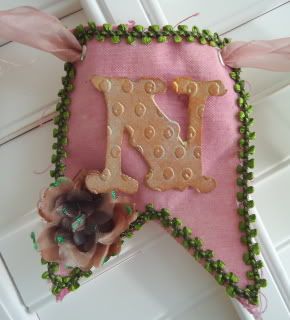
In general, I placed the letters and made a light pencil mark (that could be covered by a letter) where they would go on each of the four middle panels. Then I embellished around that area and attached the letters last. I found if I did it the other way putting the letters on first, I was apt to get glue on them. I used a clear drying very tacky glue like Scrappy Glue or Aleene's Tacky Glue to attach all the embellishments. Double sided red tape did not hold for me but I live in a very humid part of the country. All lace used to edge the panels was put on the back of the panels. Ribbon and trim was attached to the front.


End panels: I took a length of satin pleated ribbon (Websters' Pages....from the ACOT store) and formed the circle for the wreath. I overlapped the ends, glued and glued ribbons. I used a bit of Stickles to outline the panel.

Image


"N" panel: I put the ribbon on the front following the stitch lines. I used Stickles on the flowers to high light them just a bit.


Image


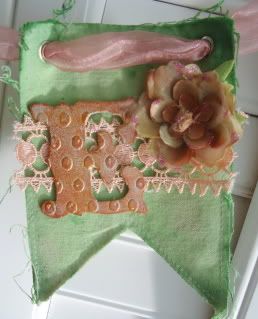
"O" panel : I ran the Brilliance ink pad over the white lace to 'age' it and heat set the ink. .

Image


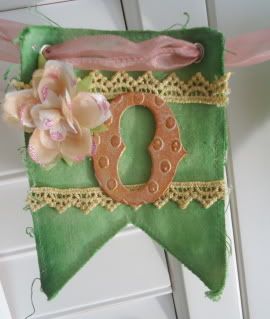
"E" panel: The lace was already a soft pink which made assembly for this one easy. I used ready made flowers (also in the store...see the supply list given in the crop forum)and just enhanced them a bit.

Image


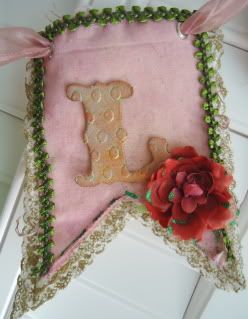
"L" panel: I got really carried away with this one. I used lace (doubled) and glued on the back, ribbon trim on the front and Stickles in a line on the bottom!

Image

The last panel is a duplicate of the first. I ran a length of sheer wide wired ribbon through the holes on each and placed large knots on either end for easier hanging.

The nice thing about these panels and that you could even do the backs in "Welcome" and place it in a door or window, or "Spring" and use it another season.

Hope you enjoyed this...please pm or post here if you have any questions at all. Thanks for taking my class
Image WAS a TIKI BAR GIRL AND ALWAYS WILL BE
User avatar

kittymomma

Cherry Cola

Re: Vintage Noel banner class here!
I love this banner! The colors are perfect for my holiday decor...I am so going to get the stuff to make this!
User avatar

scrapbookmary

Cherry Bing

Re: Vintage Noel banner class here!
good morning jules! i've been looking forward to this class!
...... but age is such a triumph over youth,
again, because you moved across the years to here.
Leaving there where it belongs
for youth to come along and re-discover. by Rod McKuen

Image
User avatar

JulesinParadise

Tiki Bar Mgr

Re: Vintage Noel banner class here!
Hi gals. I just noticed I have not changed the time on my posts yet. It is only 10:04 here. Good to see you here!
Image WAS a TIKI BAR GIRL AND ALWAYS WILL BE
User avatar

fong33

Chocolate Covered Cherry

Re: Vintage Noel banner class here!
Hi Jules. What a beautiful banner. I will be following along here.
User avatar

JulesinParadise

Tiki Bar Mgr

Re: Vintage Noel banner class here!
Thanks for taking the class. I had such fun with this one. You can do it in any colors but I liked the slightly non traditional pink and the champagne tan
Image WAS a TIKI BAR GIRL AND ALWAYS WILL BE
User avatar

fong33

Chocolate Covered Cherry

Re: Vintage Noel banner class here!
Does the diluted dye stain your hands? if so how difficult is it to get off?
User avatar

scrapbookmary

Cherry Bing

Re: Vintage Noel banner class here!
Okay. I am cutting my pieces from a piece of canvas material. I couldn't find the size of the individual pieces of the banner listed you are using. Could you give the dimensions of the banner piece? Thanks, Mary
...... but age is such a triumph over youth,
again, because you moved across the years to here.
Leaving there where it belongs
for youth to come along and re-discover. by Rod McKuen

Image
User avatar

JulesinParadise

Tiki Bar Mgr

Re: Vintage Noel banner class here!
Going to post Part II now so will edit and add it to the rest of the directions. Remember, if you have any questions on any part, please don't hesitate to ask here or to pm me.
Image WAS a TIKI BAR GIRL AND ALWAYS WILL BE
User avatar

scrapy1967

Cherry Jubilee

Re: Vintage Noel banner class here!
Awesome banner! I can not wait to get my order with this in it.
ImageImage 
 
User avatar

Kimandasmo

Cherry Jubilee

Re: Vintage Noel banner class here!
Can't wait till I am done hosting so I can pop back in and check out this whole class. It looks awesome.
User avatar

JulesinParadise

Tiki Bar Mgr

Re: Vintage Noel banner class here!
The banner pieces measure 4 inches across x 5 1/2 inches top to bottom...hope that helps. Mary, unless you double your pieces, yours may absorb more color than the Maya Road ones...just an FYI.
Image WAS a TIKI BAR GIRL AND ALWAYS WILL BE
User avatar

fong33

Chocolate Covered Cherry

Re: Vintage Noel banner class here!
Where can I get fantastix applicators?
User avatar

scrapbookmary

Cherry Bing

Re: Vintage Noel banner class here!
thanks for the dimensions. i have a thick material than i think will work. i'll let you know!
...... but age is such a triumph over youth,
again, because you moved across the years to here.
Leaving there where it belongs
for youth to come along and re-discover. by Rod McKuen

Image
User avatar

JulesinParadise

Tiki Bar Mgr

Re: Vintage Noel banner class here!
Let me see if ACOT carries them. Hold a sec and I'll look.

I did not see them in the store. If you have a small rounded paint brush, you can apply the ink with that too.
Image WAS a TIKI BAR GIRL AND ALWAYS WILL BE
User avatar

JulesinParadise

Tiki Bar Mgr

Re: Vintage Noel banner class here!
Any questions before I edit and post Part III: embellishments?
Image WAS a TIKI BAR GIRL AND ALWAYS WILL BE
User avatar

scrapbookmary

Cherry Bing

Re: Vintage Noel banner class here!
got it!you make it look so simple! and it's so beautiful!
...... but age is such a triumph over youth,
again, because you moved across the years to here.
Leaving there where it belongs
for youth to come along and re-discover. by Rod McKuen

Image
User avatar

writerlady

Bowl Full of Cherries

Re: Vintage Noel banner class here!
Jules - I have been waiting for this class! Yay!
Please stop by my blog,Writerlady's Craftroom


User avatar

writerlady

Bowl Full of Cherries

Re: Vintage Noel banner class here!
OOh - learning new things here! dying... and painting and then distressing...
Please stop by my blog,Writerlady's Craftroom


Post Reply

Return to “Nov 2010 Crop”

Information

cron